|
Design Elements of Your
Dust Collection System:
 |
|
figure3
|
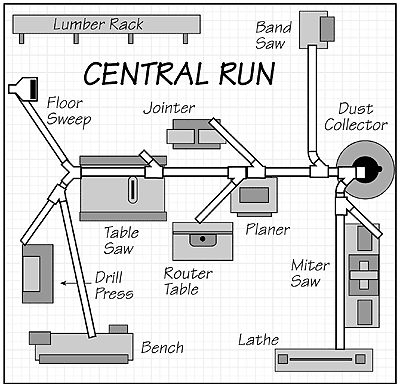
Start
your main run off the dust collector (Figure 3)
a 90 elbow (the same diameter as the opening)
connects to the intake port of your dust collector (Chart
2). Use a draw band connector (#N-DBC) for most flexibility.
You’ll need to determine the distance from the end of
the elbow to the ceiling. Use another elbow to connect the
vertical pipe to the main on the ceiling.
The
diameter of your main duct
normally will be determined by the diameter of the intake
port of your dust collection system (Chart 2).
(Remove any wye adapters before measuring this opening, cyclone
units typically will not have this adapter). Avoid runs of
ducting (and machine ports) smaller than 4" diameter.
Spiral ductwork requires couplers to connect pipe sections
and fittings together.
Placement
of 45 laterals and wyes [#LAT] or [#WYE]
Branches off your
main run may be a smaller diameter (4" is typical for
a small shop). Use laterals and wyes as transitions from main
to branches and to reduce to the smaller diameter of the branch.
To determine the placement of a wye on the main duct branch,
draw a line from the machine to the main duct meeting it at
45. The intersection will determine the placement of the
wye (Figure 1). In the case of an obstruction,
use a combination of 45 elbows [#45E]. A length
of flexible metal pipe [#N-FH] can be used to
circumvent the obstruction.
Drops to your machines
are shown in Figure 3. If your machine has a
4" port, a length of 4" flex hose (#N-CVD
or #N-J13) will run from the port to a blast gate.
In Figure 3, the gate connects to the main via a lateral,
45 elbow and a length of 4" pipe. At the drop at the
end of a run, a 90 elbow off the branch is used. Connect
your pipe to the ceiling or wall: Use ceiling brackets (#N-
HB), for a ceiling and wall suspension use brackets
every six feet of main pipe. Brackets and hangers should be
at least four inches from any pipe couplers or other joints.
Once your drawing is complete, indicate what components are
needed and make a list of components (bill of materials).
Installation Tips
For safety, always
use work gloves and goggles when assembling your system. The
main duct may be assembled on the ground in sections. If you
work on top of scrap plywood you can layout the position of
angled branches, to determine the length of straight pipes
that extend between them. If you have to cut a piece of pipe,
use a saber saw and a metal cutting blade. Wrap tape around
the pipe at the position of the cut, drill a pilot hole and
cut using the edge of the tape as a guide. Apply caulk at
the connections and force fit the components together. Secure
with pop rivets.
Note: Sheet metal screws may snag wood chips and cause
obstructions.
|